Table of Contents
Pavers that sink, tilt, or heave after a single winter aren’t a paver problem. They’re a base problem. This patio base depth guide covers exactly what goes into getting the base right: how deep to dig by project type, how soil conditions and drainage change those numbers, how to calculate your total excavation depth step by step, which base material to use, and how to turn all of it into a material quantity you can
confidently order.
The surface gets all the attention at the planning stage, but the base underneath determines whether your patio holds up for 20 years or needs to come apart in two. Tearing out and relaying a patio costs more than the original install: new labor, new sand, possible base repairs, and the frustration of doing it all twice.
Crushed Stone Calculator is built to help homeowners and contractors land on practical material estimates before the first shovel hits the ground. This walkthrough brings that same approach together in one place.
Why getting patio base depth right matters more than the pavers themselves
The hidden cost of a shallow base
When a base is too thin, the subgrade beneath it shifts under load and freeze-thaw cycling. That movement transfers directly to individual pavers: they tip, separate, and in some cases crack. The consequences aren’t just cosmetic. Water pools in the low spots, trip hazards develop at the raised edges, and mortar joints fail. The fix is a full tearout, not a patch job.
A shallow base doesn’t fail slowly. In climates with real winters, a base that’s even two inches short of the mark can go from flat to noticeably uneven in one frost season. By the time the problem is visible on the surface, the base has already moved multiple times.
The three layers every patio sits on
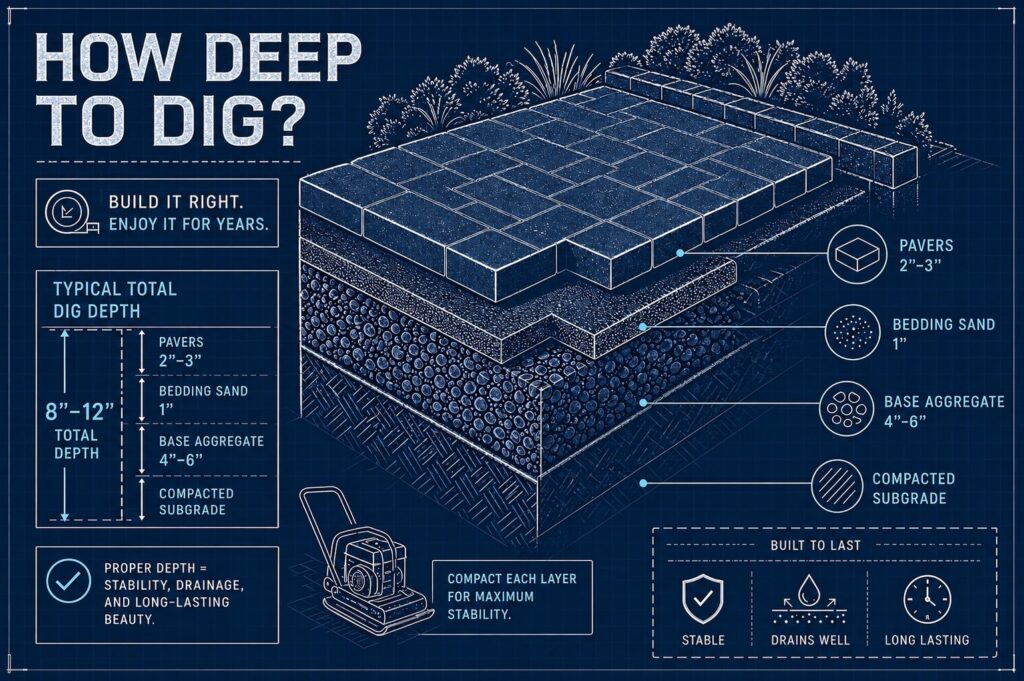
A properly built patio has a specific anatomy from the ground up: compacted subgrade (the native soil, graded and tamped), then the crushed stone sub-base, then a sand bedding layer, and finally the pavers themselves. When this guide refers to “base depth,” it means the compacted aggregate sub-base layer specifically, not the total distance you dig. That distinction matters because your total excavation is always deeper than the base depth alone, once you add sand bedding and paver thickness.
Patio base depth guide, recommended depths by project type
Patios and walkways: foot-traffic loads
For most residential patios and walkways carrying foot traffic, the standard compacted base depth is 4 to 6 inches. Four inches is appropriate for sandy, well-drained soil with a stable subgrade. Four inches is commonly used as a minimum pedestrian base depth under ICPI (Interlocking Concrete Pavement Institute) guidance, while 6 inches is a safer target for many U.S. residential patio projects, especially where soil or drainage conditions are less than ideal. When in doubt, go with 6 inches. The difference in material cost is small; the difference in long-term performance is not.
These depths refer to the compacted base only. Sand bedding and paver thickness both add to your total excavation depth, which the calculation section below covers in full.
Residential driveways and heavier-load areas
Vehicular loads are a different category entirely. A residential driveway carrying passenger vehicles needs a minimum of 6 to 8 inches of compacted base. Eight to 10 inches is the right target for areas that see heavy trucks or frequent turning. Farm entrances, commercial pads, or driveways in soft soil conditions should reach 12 to 14 inches, often using a layered system with two aggregate grades: large angular stone at the bottom for drainage and load transfer, smaller compacted material above it.
The contrast is worth stating plainly: a patio base runs 4 to 6 inches; a standard residential driveway runs nearly double that. If you’re planning a combined patio and driveway project, don’t use patio depths for the driveway section. The loads are fundamentally different.
How soil type and drainage change the depth you need
Sandy, silty, and stable soils
Sandy soils with good natural drainage are the best-case scenario. Four to 6 inches of compacted base is sufficient for pedestrian applications; 6 to 9 inches handles residential driveways. Silty soils are less stable and more prone to erosion under the base layer. For pedestrian use on silty soil, target 6 to 8 inches; for vehicle traffic, push to 9 to 12 inches. The logic is straightforward: a weaker subgrade needs more aggregate depth to distribute load and prevent settlement.
Clay soils and areas with poor drainage
Clay is where most DIY installs run into trouble. Clay expands when wet and contracts when dry, which means constant movement beneath the base regardless of how well it was built. The minimum for a foot-traffic patio on clay is 8 inches of compacted base; residential driveways on clay need 12 inches. In freeze-thaw climates, go deeper still: frost penetrates saturated clay aggressively, and the heave cycles it creates will displace even a well-built base if it’s undersized.
Poor drainage compounds the problem. If the site has standing water after rain, or the water table is high, add 2 to 4 inches to whatever depth the soil type alone would suggest. For peat soils or chronically wet sites, the aggregate base alone isn’t enough. Soil replacement or a geotextile fabric separation layer should go in before any aggregate, to prevent the base material from gradually migrating into the soft subgrade beneath it.
Calculating total excavation depth
Breaking down the excavation depth formula
The formula for total excavation depth is: compacted base depth + 1 inch sand bedding + paver thickness − 3/8 inch compaction adjustment. That last number accounts for the slight upward seating of pavers as the bedding sand consolidates under load. For a typical residential patio using a 4-inch base, 1-inch sand bed, and a standard 2 3/8-inch paver, the math works out to exactly 7 inches of total excavation: 4 + 1 + 2.375 − 0.375 = 7.
Each component has a specific role. The sand bed provides the fine-graded surface for seating the pavers evenly; the base does the structural work; the compaction adjustment keeps the finished surface flush with adjacent grade. Change any one number and your total excavation changes too. For a practical walk-through on digging depths and staging your excavation, see this guide on how deep to dig for pavers.
Adjusting for your specific paver and bedding choice
Thicker architectural pavers, often 3 1/8 inches, add to the total dig. Thinner pavers reduce it. The sand bedding layer should stay at 1 inch; keeping it to a maximum of 1.5 inches is the standard, because a thicker bedding layer introduces long-term settlement as the sand redistributes. Don’t try to use extra sand to compensate for a low base. Fix the base depth instead.
One more number to account for: excavate the footprint 6 to 12 inches beyond the finished paver layout on all sides. This extra margin accommodates the base overhang and the edging restraints that hold the perimeter pavers in place. Skipping this step leaves base material unsupported at the edges, which is exactly where paving failures start.
Choosing the right base material and compacting it correctly
Crushed stone, road base, and stone dust compared
Angular crushed stone, 3/4-inch minus, crusher run, or graded aggregate base (GAB), is the standard choice for paver sub-bases. Angular particles lock together when compacted and provide stable support, which is critical for a structural sub-base. Drainage performance depends on the gradation and fines content of the material. The gravel base thickness you need depends on your load and soil conditions, but the material type stays consistent: angular stone outperforms rounded alternatives in every sub-base application. Road base and GAB are engineered versions of the same concept, graded to a tighter specification for higher-load or commercially specified applications. For most residential patios and driveways, crusher run is the practical, cost-effective default.
Stone dust works well as a fine bedding layer or in tight-fit paving systems, but it’s not a replacement for the crushed stone sub-base. Avoid rounded materials like pea gravel entirely for sub-base work. They don’t interlock under compaction, which means they shift under load. No amount of depth compensates for using the wrong material.
Compaction specs and how to install in lifts
Compaction is not an optional finishing step. It’s what turns loose aggregate into a structural layer. For DIY installs, a plate compactor with at least 3,000 to 5,000 pounds of compaction force is the right tool. Most rental yards stock them. Apply base material in 2 to 4-inch lifts and compact each layer fully before adding the next. Trying to compact 8 inches of material in one pass leaves an unstable core, even if the surface feels firm underfoot.
After completing the base, check for flatness. The compacted base should have no variation greater than 1/8 inch across any 10-foot span. Variations larger than that cause pavers to rock during installation and show as visible waves in the finished surface. Take time with this check before the sand goes down; fixing it afterward means digging back out.
Building your material estimate and project brief
Turning base depth into a stone quantity
Once the base depth and project dimensions are set, the next step is converting volume into cubic yards and tons, the units suppliers actually quote. The basic calculation is: length (ft) × width (ft) × depth (ft) ÷ 27 gives cubic yards. Multiply cubic yards by the material’s density (roughly 1.4 to 1.5 tons per cubic yard for crusher run or limestone) to get US tons.
Always add a 10 to 15% waste factor on top of that calculated quantity. Compaction loss and irregular project edges both consume more material than a clean geometric calculation suggests, and running short mid-project is far more disruptive than having a small surplus on hand.
Using the Crushed Stone Calculator paver base depth calculator
This is where the math becomes simple. At Crushed Stone Calculator, you enter your project dimensions, set your base depth, and choose your material type. Common materials such as limestone, granite, crushed stone/gravel, and stone dust are available, with selected density values built in for planning estimates. The patio base depth guide calculator returns cubic yards, estimated tons, and an optional material cost estimate, with the waste factor already applied and adjustable if your project needs a different percentage.
Having a printed estimate with the correct material type and quantity on hand before you call a supplier changes the conversation entirely. No more “give me a couple tons and see if that’s enough.” You arrive with specific numbers, and the supplier can quote accurately and pull the right product. That’s a faster call and a better outcome on delivery day.
What to hand your contractor or supplier
A complete project brief should include: the total excavation depth with the calculation shown, the target compacted base depth, material type and grade (such as 3/4-inch crusher run or GAB), total quantity in both cubic yards and tons, the waste factor applied, and the full project footprint dimensions including the 6-to-12-inch base overhang. These details take minutes to compile and give a contractor or supplier everything they need to confirm scope and quote accurately.
Getting the base right is the whole job
Base depth is the single variable that most determines whether a patio holds up or comes apart. The key numbers to carry with you: 4 to 6 inches of compacted base for foot-traffic patios on stable soil, 6 to 8 inches for driveways, and 8 to 12 inches when clay soil or poor drainage is in play. Total excavation is always deeper than base depth alone, add your sand bedding, paver thickness, and the compaction adjustment to get the real dig number. Use angular crushed stone, compact in lifts, and check for flatness before the sand goes down.
Keep this patio base depth guide handy when you’re ready to order materials. Before purchasing a single ton, run your numbers through the Crushed Stone Calculator.A practical estimate takes two minutes and helps you avoid the two most common ordering mistakes: coming up short mid-project and overpaying for material you don’t need. Get the base right, and everything above it has a much better chance to hold.
Pingback: Gravel base for pavers: materials, depth, and installation