Table of Contents
Many gravel driveways fail prematurely, not because of bad stone, but because of bad planning. Wrong depths, skipped layers, and guessed quantities lead to ruts, pooling water, and a surface that looks tired before it’s had a chance to settle. This gravel driveway installation guide walks you through the full process: layout and permits, material selection, estimating how much to order, and laying each layer correctly. Follow these steps and you’ll have a better chance of building a driveway that drains well, holds up under normal use, and stays easier to maintain over time.
The good news is that this isn’t a complicated project. It rewards careful preparation far more than it rewards muscle or expensive equipment. Get the planning right and the physical work becomes straightforward. Skip it and you’ll be regrading every spring.
Plan before you dig: layout, drainage, and permits
Start with a simple sketch of your driveway on paper. Mark the length, width, and any curves or widening areas near the garage or parking pad. A standard single-lane driveway runs 10 to 12 feet wide; a two-car width is 20 to 24 feet. Pinning down these numbers early is critical, because every calculation you do later flows from them: stone volume, material cost, equipment rental time, all of it.
Before breaking ground, check with your local building department about permit requirements. Many counties require a permit if you’re connecting to a public road or installing a new culvert. Fees are typically low (usually $50 to $200), and the inspection process often catches drainage issues before they turn into expensive problems. Requirements vary significantly by state and county, so don’t assume the neighbor’s
project didn’t need one just because yours won’t.
Walk your site after a rain and note where water moves and where it pools. If your driveway runs downhill toward the house or a low point, you need a drainage plan built in from the start, not added as an afterthought. A 1 to 2% side slope away from the driveway’s center is the baseline; steeper terrain calls for the additional solutions covered later in this guide. Spotting these conditions now saves you from a much harder fix after the stone is already down.
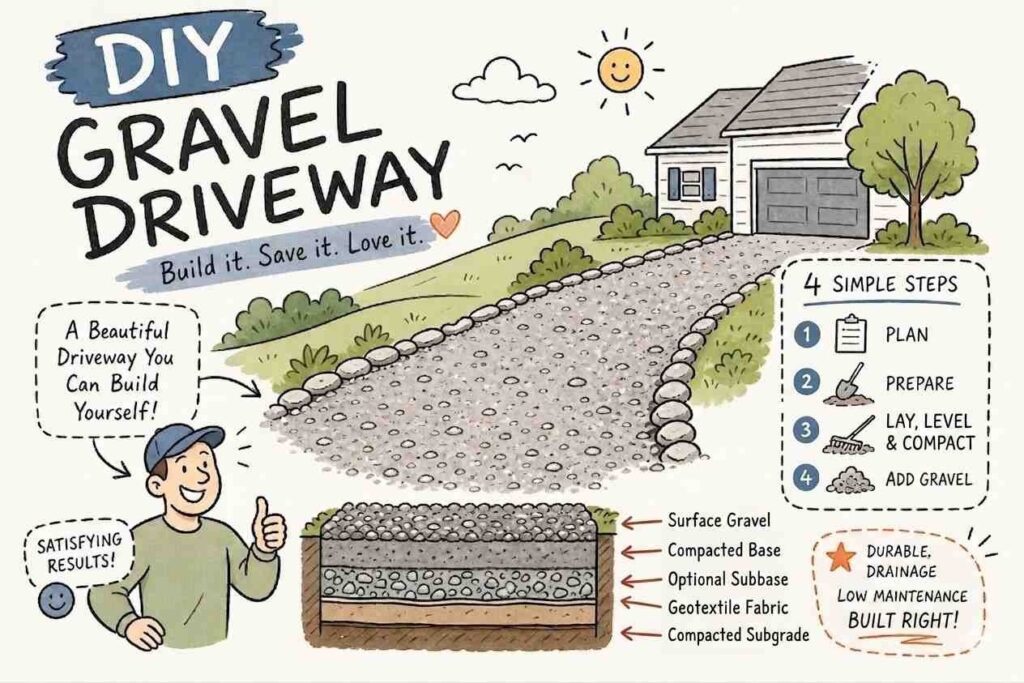
The three-layer system: which stone goes where
A properly built crushed stone driveway is a layered system, not a single dump of gravel. Each layer has a specific job, and skipping one creates a weak point that traffic and water will find over time.
Sub-base
The sub-base is the lower support layer used when the soil is weak, drainage is poor, or the driveway will carry heavier loads. For many light residential driveways on stable soil, a compacted dense base and surface layer may be enough. Where extra support is needed, use larger angular crushed stone such as #3 or #4 stone below the dense base layer.
For light residential use, many driveway systems start around 6 to 8 inches below finished grade. For a fuller base-and-surface system, weak soil, poor drainage, clay-heavy soil, freeze-thaw climates, or heavier vehicles, 8 to 12 inches of excavation may be more appropriate. In more demanding cases, deeper excavation may be needed based on local soil and contractor or supplier guidance.
In soft, clay-heavy, or waterlogged soils, consider geotextile fabric between the native soil and the base stone before adding aggregate. Woven geotextile is often used where strength and separation are the priority, while non-woven fabric can be useful where filtration and fines retention matter more.
Middle layer
Not every driveway needs a middle layer, but high-traffic driveways or deeper layered systems can benefit from one. This layer bridges the larger lower stone and the finer surface material, helping lock the lower stone in place and creating a more even surface for the top layer.
Depending on the local stone sizes available, this layer may use intermediate angular crushed stone such as #4 stone or a transition layer such as #57 stone. The goal is not one universal size, but a stable bridge between the lower support stone and the wearing course.
Wearing course
The top layer, commonly around 2 inches, is the wearing course: what you and your vehicles interact with every day. #57 crushed stone around 3/4 inch is a widely used all-around surface choice because it drains well, looks clean, and stays more stable than rounded stone when placed over a properly compacted base. Crusher run can work well as a budget surface option or on slopes where binding fines help reduce shifting, but it may be dustier and less decorative than clean stone.
Pea gravel looks attractive but migrates too easily for most working driveways. Stick with angular material for a driveway that sees regular vehicle traffic. For a deeper look at recommended materials and help choosing the right stone for your site, see the Best gravel for driveways: Types, Layers, and Costs Guide. Also, if you want a visual reference for sizes and uses, this gravel size chart is a helpful resource.
Gravel driveway installation guide: calculating how much to order
The math is straightforward once you understand it. Multiply your driveway’s length in feet by its width in feet by the layer depth in feet, then divide by 27 to convert cubic feet to cubic yards. To find weight in tons, multiply cubic yards by the stone’s density, which runs 1.4 to 1.7 tons per cubic yard depending on material type. A 100-foot by 12-foot driveway with a 6-inch base layer works out to roughly 22 cubic yards and 31 to 37 tons of stone for that layer alone. Run this calculation separately for each layer, then add the totals together.
If running three separate layer calculations sounds tedious, this is exactly what How Much Crushed Stone for a Driveway: Layers and Cost is built for. Enter your driveway dimensions, select your stone type, and the tool handles the cubic yard conversion, weight in tons, and estimated material cost in seconds. It also applies a customizable waste factor, so you’re not placing a supplier order on a number that ignores spillage and compaction. Use it before you call a supplier and you’ll show up to that conversation with a supplier-ready estimate you can trust. For a quick reference on calculating gravel quantities, see this calculating gravel guide.
Always order 10 to 15% more material than your base calculation shows to account for compaction, spreading losses, and edge topping. Running short means a second delivery charge, which typically costs more than the overage stone itself. Build that buffer in from the start.
On pricing: as of 2026, common driveway gravel and crushed stone prices vary widely by region, quarry distance, material type, and order size. For planning, many bulk gravel products fall around $20 to $75 per ton, while common crushed stone often lands closer to $25 to $50 per ton before delivery. #57 stone may be cheaper in quarry-heavy regions and higher in urban or coastal markets. Crusher run or local road base is often one of the more affordable structural base options, but supplier prices vary. These are material-only planning ranges and do not include delivery, fuel surcharges, minimum order fees, or spreading charges.
Excavation and layer installation: doing the work right
For a standard residential driveway, excavate 10 to 12 inches below finished grade. In northern climates with significant freeze-thaw cycles, go deeper, up to 14 inches, to account for frost movement in the base. For repeated heavy truck traffic or weak subgrades, that deeper end of the range is the right starting point, not the exception.
Mark your layout with stakes and string lines before any digging starts. Keep the subgrade as even as possible and remove all organic material, roots, and soft spots before placing any stone. Organic material under a driveway compresses over time and creates the exact conditions that cause settling and ruts. For more detailed guidance on excavation depth and best practices, see this excavation depth guide.
Place the sub-base stone first and spread it to an even depth. Compact in maximum 4-inch lifts using a plate compactor or vibratory roller. Compacting thicker lifts creates uneven density, one of the most common installation mistakes, and causes settling that shows up months later. Add the middle layer if you’re using one, compact again, then spread and compact the surface layer.
Hand tamping is not sufficient to achieve uniform density, especially in the base. For a typical residential driveway, plan on renting a plate compactor (roughly $60 to $120 per day at most equipment yards). For larger projects, a skid steer or mini excavator speeds up excavation and stone spreading considerably. Hand tools, rakes, shovels, a line level, and marking stakes, cover the rest.
Drainage solutions that keep water from destroying your work
The single most effective drainage technique is crowning the driveway: building the center slightly higher than the edges so water naturally sheds to the sides rather than pooling. A crown of 1 to 2 inches across a 12-foot width is enough. Combine this with a consistent longitudinal slope of at least 1% (about 1 inch of drop per 10 feet of run) to keep water moving rather than sitting.
Where natural grading isn’t enough, install a swale along one or both sides of the driveway. A swale is a shallow channel that collects and redirects runoff before it undermines the driveway edge. For high water volume or steep slopes, a French drain handles overflow: size the trench 6 to 12 inches wide and 18 to 24 inches deep, fill with clean angular stone or a perforated pipe wrapped in filter fabric, and ensure it carries water to a safe discharge point.
On steep driveways, water bars cut across the surface at intervals interrupt downhill flow and prevent gravel from washing away during heavy rain. For additional drainage product options and installation ideas, this drainage solutions overview is practical and visual.
Poor drainage is the root cause of most gravel driveway failures. Water softens the foundation, washes out fines, and feeds the freeze-thaw cycle that breaks apart even well-compacted bases. Building drainage into the design from the start isn’t optional, driveways with good drainage routinely outlast those without it by many years.
Stabilization grids and maintenance to prevent common failures
For areas that see repeated turning, braking, or heavy loads, plastic honeycomb stabilization grids filled with gravel significantly reduce surface migration. Made from HDPE, the grids lock stone into individual cells that prevent lateral movement and downward displacement. Installation follows the same base preparation as a standard driveway: compact the subgrade, level the base, lay the grid panels using interlocking connections, fill each cell with clean 3/4-inch angular gravel, and compact the filled surface. They’re especially useful at entry points and turnaround areas where tires stress the surface most and bare gravel would scatter within a season.
Even a well-built gravel driveway loses material over time through displacement and compaction. Plan on periodic top-dressing (often every few years) with a fresh 1 to 2 inches of surface stone. Rake or blade the surface smooth before adding new material so you’re not burying ruts under fresh stone. Inspect and regrade each spring after frost heave has settled and before the ground dries out completely.
Three failures account for most of what goes wrong: ruts from under-compacted base layers, edge crumbling from inadequate shoulder support, and washouts from poor drainage. All three are preventable. Compact thoroughly in proper lifts, use edging or heavy base stone at the shoulders, and design your drainage plan before the first stone goes in. Fixing these problems after installation costs far more in time and material than preventing them during the build.
Build it right and you won’t revisit it for years
A gravel driveway done right is one of the most durable and cost-effective surfaces you can put on a residential property. The key is treating the planning and base work as seriously as the surface you can see. This gravel driveway installation guide covers every stage, dimensions, materials, calculations, drainage, and compaction, because each one affects the others. Get them right in sequence and the finished product takes care of itself.
Before you call a supplier, use the Crushed Stone Guides, Crushed Stone Calculator to pin down your material order. Enter your dimensions, pick your stone type, and you’ll get cubic yards, estimated tons, and cost with a built-in waste factor for spillage, compaction, and uneven ground. It’s free and takes about 30 seconds, which is a fair trade for walking into that supplier conversation with confidence instead of guesswork.
Nail the prep work, layer by layer, and this is a driveway you build once.
Pingback: French Drain Gravel: Right Type, Size & How Much to Order
Pingback: Gravel base for pavers: materials, depth, and installation
Pingback: Which Crushed Stone Size Is Best for a Long Gravel Driveway