Table of Contents
A proper gravel base for pavers is the real reason most patios last, not the pavers themselves. A carefully laid patio will sink, tilt, or crack within two to three years if the base beneath it was too shallow, poorly compacted, or built with the wrong material. The pavers get blamed, but the base is the real culprit.
This guide covers the full picture: which base gravel actually works (and which ones to skip), how deep to go based on your project type and soil, how to compact in lifts so the base doesn’t settle later, and how to calculate exactly how much material to order before you call the stone yard. Before you’re done reading, you can run your numbers through the Crushed Stone Calculator and show up at the supplier knowing exactly what to ask for.
Why the base layer separates a lasting patio from a sinking one
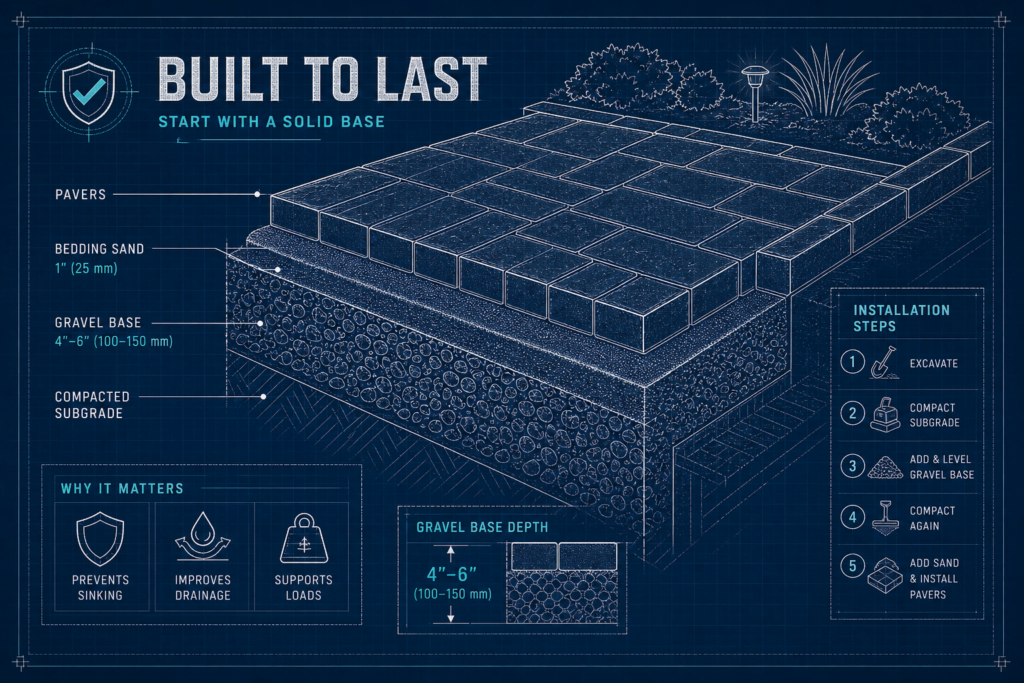
A compacted gravel base for pavers does three jobs simultaneously: it distributes load across the subgrade, drains water away from the surface, and creates a stable, level platform that resists frost heave and organic movement. Poor drainage leads to frost heave and pumping; inadequate load distribution causes rutting and settlement; and a platform that shifts under pressure produces visible cracking and edge creep. Lose any one of those functions and the surface becomes unpredictable.
One thing that trips up a lot of DIYers is conflating the base course with the bedding layer. These are two different things. The base course is the main structural layer, typically 4 to 12 inches of compacted crushed stone for paver base, depending on the application. The bedding layer sits on top: a single inch of coarse concrete sand or high-performance bedding (HPB) stone that provides fine-tuned leveling for the pavers themselves. That bedding inch does not count toward your structural base depth. Plan your excavation depth around base thickness, plus one inch of bedding, plus the paver thickness (usually 2 to 3 inches).
The most common failure modes all trace back to base preparation. Pavers sink in soft spots because the base was too thin or the subgrade was never compacted. Frost heave buckles surfaces in cold climates when water infiltrates a shallow base and freezes. Water pools at joints when fines in the base have washed away. Edge creep happens when the base was never properly confined. Every one of these is preventable.
Gravel base for pavers: best material types
The core choice comes down to two approaches: dense-graded aggregate for maximum stability and load distribution, or open-graded crushed stone for drainage-first situations. Neither is universally better. Your project type and climate determine which one belongs under your pavers. For more on the characteristics of different base materials, see the practical overview of gravel for paver base.
Crusher run, CR6, and DGA: the dense-graded standard
Crusher run goes by several regional names including CR6, Quarry Process, Dense Graded Aggregate (DGA), and aggregate base course (ABC). Regardless of the label, it’s the same material: crushed stone blended with fines ranging from 3/4 inch down to stone dust. When you compact it in proper lifts, those fines bind the stone together into a near-concrete-like base that handles heavy loads without rutting. This is the right call for driveways, high-traffic patios, and any situation where load distribution is the priority. The tradeoff is permeability: crusher run drains poorly, which matters in wet climates or permeable paver systems.
#57 stone and 3/4″ crushed stone: the open-graded option
#57 stone and clean 3/4 inch crushed stone contain minimal fines, which creates void space between the particles and allows water to flow through freely. This makes them the preferred choice for patios in wet climates, drainage-focused installs, and permeable paver systems. The tradeoff is stability: without fines to bind the particles together, open-graded bases are less suited for vehicle loads unless they’re paired with a dense-graded sub-base below. A common professional setup combines a deep CR6 base with a layer of clean 3/4 inch stone above it, getting the benefit of both approaches.
What to skip: rounded stone and limestone screenings
Rounded stone, including pea gravel and river rock, does not compact. Angular edges are what lock crushed stone together under load; without them, the base shifts and your pavers move with it. Limestone screenings (stone dust) are equally problematic when used as a primary base material. They pack tight initially, but they hold water, erode in freeze-thaw cycles, and can void some paver manufacturer warranties, ICPI guidance discourages screenings as a structural base for this reason. Use screenings as a joint filler if you want, but never as the structural base layer.
Gravel base for pavers: recommended depths by project type
Base depth is not one-size-fits-all, and using the low end of every range regardless of conditions is how projects fail. The right depth depends on how the surface will be used, what soil sits beneath it, and whether your region experiences hard freezes.
For pedestrian patios and walkways, 4 inches is the minimum on established, well-draining soil. Frost-prone climates or areas with clay soil need at least 6 inches, which aligns with ICPI guidance calling for an additional 2 to 4 inches in cold or wet conditions and is consistent with Unilock’s installation guidance. Plan to account for compaction: loose material typically compacts roughly 20 to 25 percent. If you’re entering your target compacted depth into the calculator, set the waste factor to 25–30% to account for both compaction loss and spillage. If you’re entering your loose-fill depth, a 10% waste factor for spillage alone is typically sufficient.
Residential driveways require substantially more. Light-use driveways with occasional cars need 6 to 8 inches on established soil, or 8 to 10 inches on clay or newer fill. If the driveway will handle frequent trucks, RVs, or heavy deliveries, plan for 8 to 12 inches minimum. On poor subgrades, some engineers call for even more. Cutting corners on driveway base depth is one of the most expensive mistakes a homeowner can make, because fixing it means pulling up every paver. For step-by-step guidance on building a driveway base, consult the Gravel Driveway Installation Guide.
Soil type adjusts every estimate. Sandy, well-draining soil lets you use the lower end of each range. Clay-heavy or frost-prone soil adds 2 to 4 inches to the requirement, and those situations also call for a geotextile fabric layer between the subgrade and the paver gravel base. The fabric prevents clay fines from migrating upward into the base over time, which would otherwise weaken it from below and cause visible settlement within a few years. For material options and installation tips, see this geotextile fabric guidance.
Installing a gravel base for pavers: lifts, compaction, and field checks
Proper installation follows a clear sequence. Skipping or rushing any step creates a weak point that will show up later, often right after the first hard winter or the first time a heavy vehicle crosses the surface.
Excavation and subgrade preparation
Excavate to your total depth: base thickness plus 1 inch of bedding plus paver thickness. Add 2 to 4 inches in cold climates to account for frost protection. Before you add a single shovel of gravel, compact the native subgrade. A weak subgrade is the leading cause of base failure regardless of how carefully the gravel above it is compacted. In clay or poorly draining soil, install geotextile fabric directly over the excavated subgrade with seams overlapping 12 to 18 inches, secured with pins. This separation layer keeps your base material from slowly sinking into the subgrade over time. For a deeper dive on excavation depths and how far to dig, consult the Patio base depth guide.
Installing in lifts and compacting with a plate compactor
Never dump the full base depth at once. Work in loose lifts of 3 to 6 inches, 4 to 6 inches is typical for crusher run and DGA, compacting each one fully before adding the next. For residential work, use a vibratory plate compactor with 5,000 to 8,000+ pounds of centrifugal force; a useful rule of thumb is roughly 1,000 lbf of compactor force per inch of lift thickness, so match your equipment to your lift depth. Make 4 to 6 overlapping passes per lift, moving in parallel rows with about one-third overlap between passes.
If you’re working with CR6 or DGA, slightly moisten the material before compacting. The moisture helps the fines bind and improves the density you’ll achieve. Running a dry pass reduces compaction quality. For recommended equipment choices and compaction methods, see this practical guide to compaction equipment and methods.
Checking compaction before the next lift
A useful preliminary check: push a loaded wheelbarrow across the surface after each lift. No visible deflection is a good sign; wheel rutting tells you another pass is needed before adding more material. Keep in mind this is a field indicator, not a substitute for proper verification. For driveways or structurally critical work, confirm compaction with proof-rolling, a dynamic cone penetrometer (DCP), or nuclear density testing. The industry target for a structural base is 95 percent relative compaction per Proctor standards, though achieving this reliably may require thinner lifts or heavier equipment than typical residential machines provide. Falling short of adequate compaction is the single biggest predictor of long-term settling, and it’s essentially invisible until the pavers start to move.
Calculating how much base gravel you need before you order
Getting the quantity right before you call the supplier saves you from either a wasted second trip to the stone yard or leftover material you’re stuck disposing of, and the math is straightforward.
The basic formula for rectangular areas
Multiply length (feet) by width (feet) by depth (feet), then divide by 27 to get cubic yards. Multiply cubic yards by 1.4 to convert to US tons. Here’s a real example broken down step by step:
- Area: 12 ft × 16 ft = 192 square feet
- Volume: 192 sq ft × 0.5 ft (6-inch base) = 96 cubic feet
- Cubic yards: 96 ÷ 27 = 3.56 cubic yards
- Tonnage: 3.56 × 1.4 = ~5 tons before the waste factor
Irregular shapes and the waste factor
Break complex areas into rectangles and triangles, calculate each section separately, and sum the totals. A triangle’s area is base times height divided by 2. Once you have the total square footage, apply a waste factor before finalizing the order. Standard rectangular projects typically use 5 to 10 percent. Uneven terrain, irregular edges, or areas with slopes call for 10 to 15 percent or more as a general rule of thumb, verify with your supplier for local conditions. Ordering short means a second delivery charge; ordering with a proper waste factor is almost always the cheaper outcome.
Use the Crushed Stone Calculator to skip the manual math
The Crushed Stone Calculator takes your area dimensions, your chosen base material (limestone, granite, crushed stone, or others), and your target depth, then outputs an instant tonnage estimate and allows you to apply an adjustable waste factor directly to the final calculation. No spreadsheets, no unit conversion headaches, no second-guessing the density multiplier for your specific material. Enter your numbers, get your tonnage, and call the supplier with a number you can trust.
Put it all together before the first shovel goes in
The process has a logical sequence: choose the right gravel base for your paver project (crusher run or DGA for heavy loads and driveways, clean 3/4 inch stone or #57 for drainage-first installs), set the correct depth for your use case and soil type, excavate properly, compact the subgrade, install crushed stone for paver base in lifts to adequate density, and calculate your tonnage accurately before you order a single ton.
Skipping any one of these steps creates a predictable failure point. A properly built gravel base for pavers is genuinely invisible once the project is finished, and that’s exactly how it should be. Getting it right the first time costs far less than pulling up a settled patio a couple of years from now and starting over.
Before you call the supplier, run your project dimensions through the Crushed Stone Calculator. The right base material, ordered in the right amount, is what makes a paver installation last for decades instead of two years.
Pingback: Crusher Run Patio Base: Depth, Compaction & Tonnage Guide