
Table of Contents
Picture this: you walk your property line after a hard rain and find two feet of streambank gone. Across the creek, your neighbor’s slope is perfectly intact, armored with a rough blanket of angular stone that shrugged off the same storm. That rock protection is rip rap (also written riprap), and erosion control with rip rap is one of the most battle-tested bank stabilization strategies available to property owners. But it isn’t a one-size-fits-all solution, and ordering the wrong stone in the wrong quantity is an expensive mistake.
Before calling a quarry, most people are surprised by how much math is involved. Stone size depends on flow velocity and slope angle. Layer thickness is tied to your D50 median stone diameter. Tonnage follows from volume, which follows from layer depth and coverage area. Crushed Stone Calculator handles that last step for you: once you know your stone size and project dimensions, it converts everything into cubic yards and tons using standard density values, giving you a solid starting point before you confirm the final numbers with your supplier.
By the end of this guide, you’ll know whether rip rap suits your site, how to specify the right stone and underlayment, what the rip rap installation sequence looks like, which permits you’ll need, and how to keep rock armor working for decades.
Erosion Control With Rip Rap: When to Use It
The conditions that make rip rap the logical choice
Rip rap is used to stabilize areas by protecting soil surfaces from high water flow and runoff, and it works best where fast, concentrated water would wash out softer erosion controls. The core use cases are streambanks with concentrated flow, culvert outlets, drainage channels, slope faces exposed to wave action or sheet flow, and shoreline edges subject to storm surge. The governing variable is velocity: once flow regularly exceeds 5 to 10 feet per second, grass, mulch, and erosion control blankets lose the fight, though the exact threshold depends on flow duration, concentration, and the type of erosion control device in use. Consult FHWA or your state DOT’s velocity guidance for site-specific thresholds.
If you’re a property owner, DIY homeowner, contractor, or landscaper planning bank, shoreline, or drainage work, the key decision is whether your site needs structural stone or a lighter treatment. Low-energy sites are a different story. A gentle backyard swale with sheet flow under 5 fps is a good candidate for an erosion control blanket and native plantings, not a full stone revetment. Matching the tool to the energy level saves money, helps avoid premature failure, and produces better ecological outcomes on sites that don’t demand structural stone.
From there, the details that determine whether rip rap succeeds are straightforward but important: slope stability limits, stone size and type, installation sequence, filter fabric and drainage considerations, permit and environmental requirements, maintenance, common failure modes, and how to estimate stone quantity with the Crushed Stone Calculator before you order.
Slope limits for steep slopes you need to know before committing
A 2:1 slope ratio (two feet horizontal for every one foot vertical) is the standard upper limit for rip rap stability with angular stone. Beyond that, you’re in engineered-design territory, and your layer thickness and stone sizing both need to increase. Non-cohesive soils restrict you even further, because loose sand or silt won’t hold a steep bank under rip rap’s own weight without additional reinforcement.
Here’s a practical rule of thumb: slopes steeper than 2H:1V, where the bank rises more steeply than two feet horizontal for every one foot vertical, generally require an engineer or local erosion-control professional to review the design before you order a single ton of stone. Rip rap placed on an overly steep slope can fail from the bottom up, and the repair cost may exceed what you saved by skipping the review.
Where rip rap loses to alternatives
Rip rap creates a hard armored surface that can reduce natural bank vegetation and habitat value compared with softer stabilization methods. It can disrupt natural sediment movement, affect the riparian zone and nearby waterways, reduce habitat value for aquatic organisms, and requires quarrying and transport that carry a real environmental footprint. Hard armoring also prevents plants from growing, reducing shade over water, contributing to temperature pollution, and potentially increasing algae growth. In moderate-energy coastal environments, living shorelines that combine native plantings, oyster reefs, and minimal structural elements may offer better ecological value and long-term adaptability than full rip rap armoring, especially as sea levels shift.
Rip rap is the right hammer for high-energy hydraulic conditions. On low-gradient slopes with velocities under 5 fps, erosion control blankets are faster to install and far friendlier to native plant establishment. Know what you’re solving before you commit to armoring, because on some sites living shorelines or rolled erosion control products may be the better choice.
Choosing the Right Stone for Erosion Control and Bank Protection With Rip Rap
How engineers size rip rap stone (and what it means for you)
Stone sizing centers on D50, the median stone diameter where half the material by weight is smaller than that value, and proper size grading is crucial for stability. D50 is driven by two site variables: flow velocity and slope angle. For a practical reference: on a standard 2:1 slope with flow around 10 fps, expect a D50 of roughly 6 to 9 inches, and rip rap is commonly used at a layer thickness of about 1.75 to 2 times the median rock diameter. Push the slope steeper or switch to rounded stone and those numbers increase by 10 to 25 percent.
FHWA HEC-15 is a formal design reference for rip rap sizing, and NCHRP Report 568 also covers rip rap design criteria, recommended specifications, construction, inspection, and quality-control guidance. These technical references are most useful when slope, velocity, scour, or wave action makes the project more than a simple landscape installation. You don’t need to master the equations, but you do need enough vocabulary to hold a useful conversation with your supplier and, if required, your engineer. For a concise practitioner overview, see the Rip-Rap summary from Colorado State. Knowing your D50 target going into that conversation keeps the project on spec.
Angular vs. rounded rock and why it matters
Angular quarry stone is commonly preferred for rip rap because the irregular faces interlock, while rounded river rock is less stable and tends to slide. For any bank protection work, angular stone is the standard choice. On steeper slopes, angular stone is usually the safer choice because it interlocks better than rounded stone. If rounded stone is the only locally available option, some designs may require larger stone, thicker placement, or additional engineering review to compensate for reduced interlocking friction.
Before accepting a supplier’s material, check two quality benchmarks: stones should have a specific gravity of at least 2.5, and the length-to-thickness ratio should stay under 2:1. Flat, elongated pieces flip and shift under load instead of staying locked in place. Common source materials include crushed granite, limestone, traprock, and concrete rubble if it meets spec.
Gradation: why a mix of sizes beats uniform stone
Uniform stone leaves oversized voids that let fine material wash out from beneath, a failure mode called winnowing, so a filter layer is essential to keep soil from washing through; depending on the site, that layer may be geotextile, sand, or gravel beneath the stone. A well-graded mix, where the largest stone (D100) is no more than 2 to 3 times the D50, packs tighter, reduces voids, and distributes hydraulic load more evenly across the entire blanket. Ask your quarry for a gradation spec sheet and verify the D100/D50 ratio before the trucks roll, since well-graded riprap can still adjust to minor settling without catastrophic failure.
Once you have your D50 and layer thickness confirmed, translating that into a tonnage figure is straightforward with the right tool. Crushed Stone Calculator supports common stone density presets that can help you estimate rip rap, crushed stone, and related bulk rock quantities before you confirm the final material and density with your supplier. For related project planning, you can also explore our Driveway Guides.
Building a Rip Rap Installation That Holds
The installation sequence and why order matters
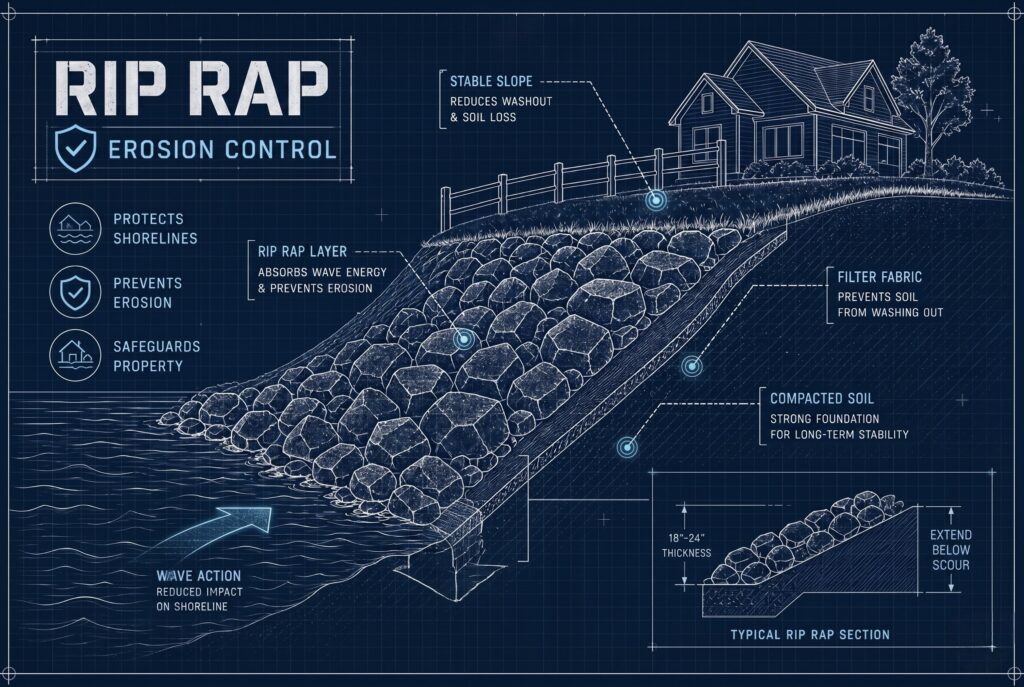
The correct sequence for any rip rap installation is: subgrade preparation, filter installation, then rip rap placement. Reversing or skipping steps is among the most common DIY mistakes and a leading cause of early failure according to FHWA field guidance. Grade the bank to your design slope first, extend the protected zone to the expected scour depth at the toe, and address drainage behind the bank face before anything else goes down. Proper site prep also means clearing debris and organic material before stone is installed.
Install your geotextile or granular filter immediately after grading, then place the rip rap so the system is installed in sequence to protect the land and maintain long-term performance. Place rip rap in a single full-thickness lift, working from the toe of the bank upward. Never use a chute or dump stone from height, that causes size segregation, where the heaviest stones roll to the bottom and the smaller fines concentrate near the surface where they’re most vulnerable to displacement, and some projects combine rip rap with native vegetation above the armored zone for added stability.
Geotextile underlayment: specs and installation details
A geotextile fabric filter has one job: keep soil from migrating up through the stone voids (a process called piping) while still allowing water to drain freely. Effective rip rap designs also include a filter layer to protect against soil washing through. Many agency specifications use non-woven, needle-punched geotextile for rip rap revetments, and some projects reference AASHTO M288 survivability classes. The exact permittivity, apparent opening size, survivability class, overlap, and anchoring details should follow the project specification or local agency guidance.
Several installation details get skipped on DIY projects. This fabric is commonly used for shoreline stabilization and stream banks because it allows water flow while filtering soil. Overlap seams by at least 12 to 16 inches, pin the fabric every 3 to 5 feet, and place rip rap immediately after fabric installation. Anchor it in a trench at the top of slope and protect it so it does not break during placement. Equipment traffic on unprotected geotextile tears it. A torn filter can create a weak point where soil starts migrating through the stone layer without you noticing. For a practical installation checklist and local-spec examples, consult the British Columbia riprap guide
Minimum thickness and toe protection
Standard minimum thickness for rip rap bank protection is 1.5 to 2 times the D50, with an absolute floor of 12 inches for most residential applications. A 9-inch D50 stone requires at least 14 to 18 inches of layer thickness on the bank face. At the toe, where scour concentrates hardest, build a thickened apron at 1.5 to 2 times the bank layer depth and extend it below the expected scour line to the expected scour depth associated with at least a 10-year storm event.
Skipping the toe apron is the single most common reason rip rap fails from the bottom up, including along streambanks and in drainage ditches. The bank gets undercut, the stone slides into the void, and the whole installation unravels within one flood season. A proper toe apron is what separates a 40-year installation from a 5-year one, budget the material accordingly.
Permits, Regulations, and Environmental Considerations
The federal and state permits you’ll likely need
Any rip rap work in, over, or adjacent to a waterway typically triggers at minimum a USACE Nationwide Permit 13 (Bank Stabilization). USACE Nationwide Permit 13 (Bank Stabilization) covers projects under 500 linear feet that don’t exceed an average of one cubic yard of fill per running foot. Projects that stay within those thresholds and avoid special aquatic sites may qualify for a simpler permit path, but permit thresholds vary by location, effective erosion control with rip rap depends on local environmental guidelines and the full stormwater system, and regional conditions can still apply, so confirm requirements with your local USACE district before starting work.
Projects that exceed those limits, or that affect special aquatic sites, may require an individual permit with a timeline that can stretch six months or more.
State-level requirements layer on top of federal ones. Maine requires a DEP permit under the Natural Resources Protection Act. New York adds DEC approvals for wetlands and water quality certification. Florida triggers FDEP review and a Coastal Construction Control Line approval if your work sits seaward of the regulatory boundary. Local shoreland zoning approval is common in most states regardless of project size, and east coast erosion control rules are one example of how regional requirements can differ. File a joint application early, permit processing alone can add weeks to your timeline and delay the construction window you planned around.
Environmental trade-offs worth understanding before you commit
Rip rap is permanent, resource-intensive from quarrying and transport, and produces a hard surface where aquatic plants and invertebrates struggle to establish. In moderate-energy coastal environments and along some riverbanks, hybrid approaches that place limited rock at the toe with native plantings above can reduce ecological impact while still providing structural support at the waterline. Some states now favor or outright require living shorelines over hard armoring for new shoreline permits. Riprap may also reduce sediment settlement in some river channels, but it still alters natural processes.
The decision isn’t binary. If your site has low-to-moderate wave energy, a hybrid design earns you structural protection where you need it most while allowing the rest of the bank to support vegetation and natural habitat, with added benefits for water quality. That’s worth discussing with your permitting agency before finalizing your design.
Inspection, Maintenance, and Realistic Lifespan
The failure modes that end rip rap’s useful life early
Six failure modes account for most rip rap losses, and a property owner can observe all of them with a sharp eye during a post-storm walkthrough. Particle erosion displaces individual stones from high-velocity zones. Toe scour undercuts the bank from below, threatening bank edges and nearby structures. Translational sliding moves the entire rip rap mass downslope. Winnowing pulls fine material out through voids. Embedment buries stone under deposited sediment. Edge failure forms scour holes at the boundary where protected and unprotected bank meet.
Most of these start small and accelerate quickly if ignored. A fist-sized void at the toe today becomes a six-foot undercut after the next flood event. Post-storm inspection is the single highest-leverage maintenance habit you can build into your property management routine.
Inspection schedule and how to make repairs
High-risk installations, bridge abutments, active channels, and culvert outlets need inspection after every significant rain or flood event because rip rap requires periodic inspections and maintenance to stop erosion problems from escalating. Moderate installations, including culvert outlets and temporary check dams, warrant closer post-storm review, while stable, vegetated bank installations can be inspected annually, but don’t skip the post-storm walkthrough during an active flood year. Look for displaced stones, visible voids, scour holes at the toe, or undercutting at the protected zone’s edges.
Repair protocol is straightforward: add properly sized stone at the toe to address scour, refill interior voids with correctly graded rock, and seal edges to prevent flow acceleration into unprotected areas. Don’t patch with whatever’s handy, gradation consistency matters for long-term stability, and mismatched stone creates new weak points in the installation.
How long rip rap lasts and what shortens its life
Well-designed rip rap with a proper filter, correct stone sizing, and a solid toe apron in a stable channel lasts 30 to 50 years with minimal maintenance. Poor stone sizing, no toe protection, or an undersized filter layer can cut that to 5 to 15 years in active hydraulic environments. Investing in proper sizing, a full toe apron, and quality geotextile can substantially extend service life, the exact gain is site-specific, but the engineering principle is consistent across FHWA and USACE guidance.
Before a single shovel hits the ground, run your rip rap volume estimate through Crushed Stone Calculator. Enter your project dimensions, select the closest material density, and get a cubic yard and ton figure with a waste factor. It’s free, and it gives you a reliable number to verify with your supplier before you place the order.
Putting It All Together
Erosion control with rip rap remains one of the most reliable approaches to bank stabilization, scour protection, and shore protection on stream banks and in drainage ditches when the site genuinely calls for it. The decision framework is straightforward: match stone size to your slope and velocity conditions, stay within permitted slope ratios, install the geotextile filter before you place a single stone, and build the toe apron thick enough to withstand the scour depth your channel produces. Very steep slopes may call for retaining walls, wire mesh gabions, turf reinforcement mats, or another engineered system instead of standard rip rap. Skip any of those steps and the rest of the installation’s quality won’t save it.
File permits early. They take longer than you expect, and the construction window for streambank work is often limited by seasonal flow conditions or state in-water work windows. Temporary check dams are another erosion-control use, but they still require inspection and local approval. Know your failure modes and inspect after storms. Deferred maintenance on rip rap is rarely cheap, what’s a minor repair in the fall can become a major reconstruction job after the next spring flood.
When you’re ready to translate your design specs into a supplier order, start with a free estimate at Crushed Stone Calculator. Plug in your dimensions, choose your material, and get estimated cubic yards and tons, complete with waste factor, before you pick up the phone. Knowing that number going in is what turns a quarry call into a confident conversation instead of a costly guess. For more case studies and project examples, visit our Blog.
For more detailed background on rip rap installation practice and local-spec checklists, see the resources cited above and consult your permitting agency. If you have questions about how the calculator handles specific waste factors or material densities, check our Disclaimer.